
10 Coloring Techniques to create texture
Oct 11, 2021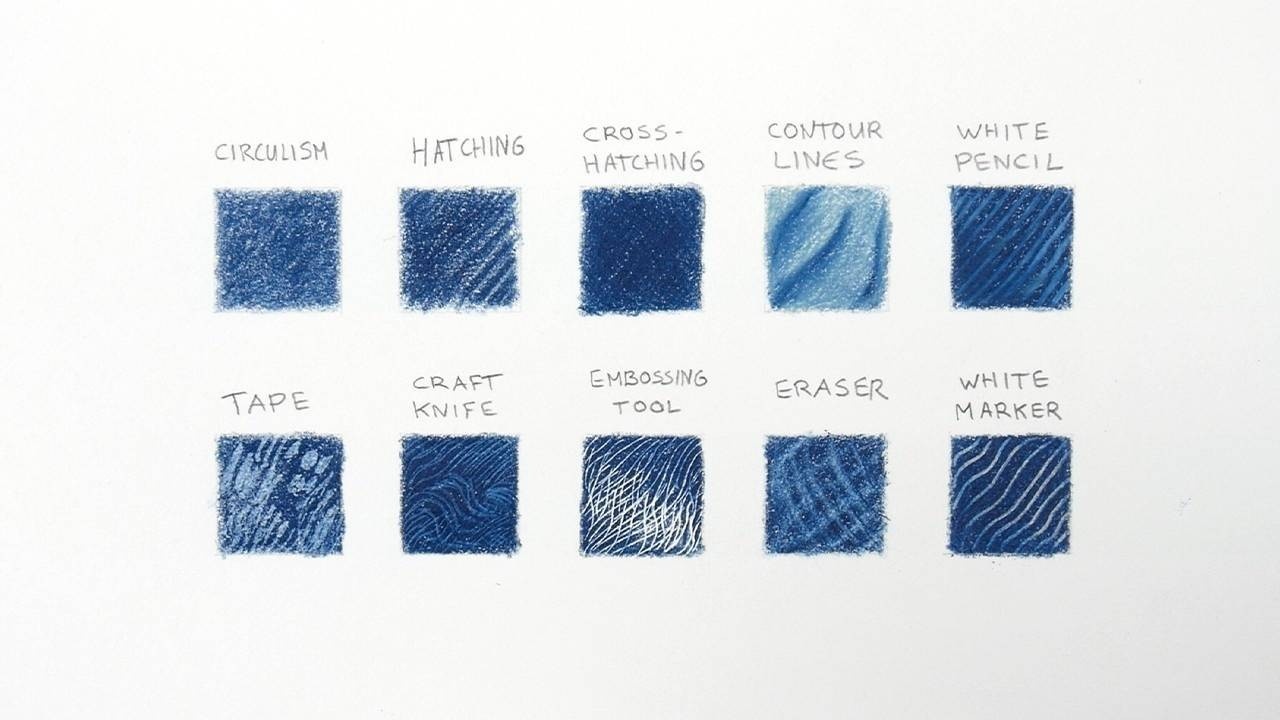
Everything you draw has some kind of texture. You will need to use different coloring techniques to create something you can normally feel.
Creating texture in your drawing will make it look more realistic. Different techniques are used for different textures. For example, you will need to use a different technique for clothing than for the skin.
Coloring Techniques
We will go over 10 different coloring techniques that will help you create texture in your drawings. In the picture above, there’s an example of each technique.
1. Circulism: this technique is used for areas where you want to create a smooth color. Color with lots of tiny circles and let the circles overlap each other. Add as many layers as you need to create the smoothness you want.
2. Hatching: a layering technique where you color an area using lines all going in the same direction. Keep your lines close together if you want a smoother finish, or leave space between the lines to create a rougher texture. This technique is often used when coloring larger areas.
3. Cross Hatching: a layering technique where you color an area with the first layer of lines going in one direction and then to make it darker you go over the area again with lines in the opposite direction. Keep your lines close together if you want a smoother finish.
4. Contour lines: color in the direction that the object curves. This technique is used to create contour lines for, for example: wrinkles or folds in clothes. Make sure to shade the lines to make it look more realistic and pay attention to where the light falls on your drawing.
5. White pencil (over dark): you can use white to create lighter tones as well as add texture on top of dark colors. Some brands of pencils are better than others. The luminance white is excellent as it is soft and opaque, this will add the texture and finishing touches very well. You can also use other lighter colors for your lighter tones.
6. Scotch tape: color an area and add several layers. Use a piece of tape to lift up some of the colored pencils. Be careful because everywhere you put the tape it will remove the color. It’s better if the tape is not too sticky because then it doesn’t pull off too much colored pencil. You can remove some of the stickiness of the tape by touching it on your pants or your skin somewhere. If you accidentally pulled up too much color, you can just recolor that area. This technique is great for small detailed areas.
7. Craft knife: After you have burnished the layers (burnishing: using medium to hard pressure on your last layer to make it smooth) you can use a craft knife to remove the colored pencil. This only works if you have enough layers of colored pencils. Be careful, you don’t want to use too much pressure because then you’ll damage or cut the paper. You also don’t want the tip to scratch your paper, just gently scrape away the colored pencil. Experiment and practice with this first, you can hold the craft knife at different angles and use different amounts of pressure to see how it turns out and to get used to this technique.
8. Embossing tool: you can use an embossing tool or you can just use the tip of a mechanical pencil. This can be handy for creating small thin details like highlights, fly-away hairs, or whiskers in animal portraits. You can indent the paper where you want fine details. Once you color over it the colored pencil won't go into those indented areas.
9. Eraser: an eraser can also help you to create highlights or texture. Colored pencils are much more difficult to erase than graphite. The more layers you have the more difficult it will be to erase. That’s why it’s important to layer using light pressure. You won't be able to erase the color completely but you can lighten it a bit. If you want to leave an area white, color around it.
10. Acrylic marker: to create very bright highlights in your drawings or to create texture in clothing you can use a white acrylic paint marker. Once it’s dry you can easily color over it again if you want to. Make sure not to press too hard with your colored pencil or you will remove the acrylic paint.
To create some kind of texture in your drawings you can use one of these techniques. It’s best to practice these techniques on another piece of paper before you try this on your drawings. Try them all out and see what works best for you.
If you would like to learn more about drawing with colored pencils you can join us in the membership. In the real-time drawing videos, you can follow my entire drawing process. While drawing, I think out loud, explain my techniques and show you how to fix mistakes when they happen.
You can also reach out if you want to so I can help you move forward. This way, you don’t have to figure it all out by yourself.
Read more details about the membership here and join us today so you can start practicing.
- Emmy
Want to be notified of new blog posts?
Sign up and you'll receive an email when a new blog is posted.
We won't send spam and you can unsubscribe at any time.